A Simple Method That Produces Healthy Garlic and Prevents Rot
Last year I decided to try growing my garlic in raised beds, and it ended up producing the best garlic I’ve ever grown.
Now I can’t say for certain that the raised beds were the only reason, but they definitely helped. We had an unusually wet summer, and many gardeners in our area struggled with garlic that either rotted in the ground or didn’t grow properly.
At the same time, we were starting a new garden area where the moose and deer like to wander through and see what’s on the menu.
If you’re planning your own garden space, you may also want to read our complete guide to gardening and greenhouse growing where I walk through how we set up our garden and greenhouse for a productive season.
So we fenced off a section for the garden and greenhouse, and the ducks roam around the yard while we’re home to keep an eye on them.
If you’ve ever had ducks, you’ll know they absolutely love anything fresh and green. If I planted directly in the ground, they would happily eat everything before it had a chance to grow.
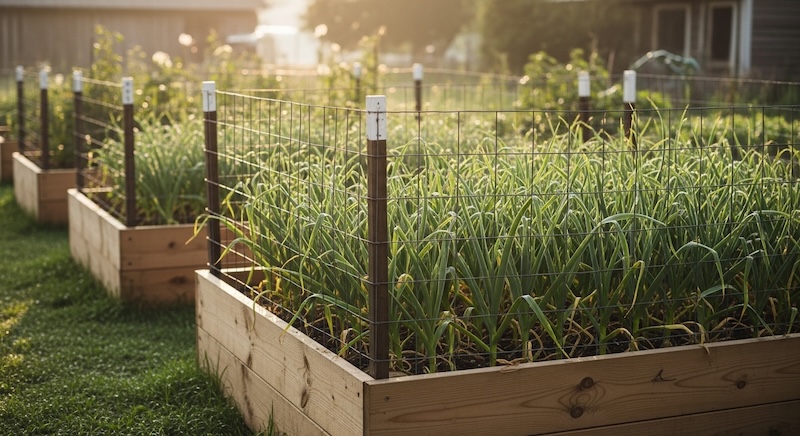
That meant the garden beds had to be raised and protected with wire.
In the end, those raised beds likely helped the garlic survive the wet summer as well.
Building Raised Beds for Garlic
The raised beds were simple to build.
I used 1×6 cedar boards and built beds that were about eight feet long and twelve inches high.
Raised beds are great for garlic because they provide:
- Better drainage
- Looser soil for bulb growth
- Less chance of rot during wet seasons
Good drainage is one of the most important things garlic needs.
If you’re planning to build your own beds, you can also find pre-made cedar raised bed kits that make setup quick and easy.
(Amazon Link Placement #1 – Raised Bed Kit)
When to Plant Garlic
Garlic should be planted in the fall before the ground freezes.
I planted mine in early October, which gives the cloves time to develop roots before winter arrives.
Start by breaking apart the garlic bulb into individual cloves.
Each clove becomes a new garlic plant.
Plant the cloves:
- 4 inches deep
- 16 inches between rows
- 5–6 inches apart in each row
Plant the cloves with the pointed end facing up.
Mulching Garlic Beds
Once the garlic is planted, the beds are left alone until the ground freezes.
After the soil freezes, cover the bed with a few inches of mulch.
You can use:
- Wood chips
- Straw
- Leaves
Mulch helps protect the garlic during winter and prevents the cloves from being pushed out of the soil when the ground thaws.
Spring Garlic Growth
In the spring the garlic begins growing underneath the mulch.
You’ll usually start to see green shoots appear in late April or early May.
When my garlic shoots were about two inches above the mulch, I gently removed some of the mulch to give them room to grow.
Garlic is actually one of the easiest crops to grow.
It requires very little care and usually doesn’t need watering unless you are experiencing a very dry summer.
Garlic Scapes
One of the best parts of growing garlic is when the garlic scapes appear.
Scapes are the curly green stems that grow from hardneck garlic plants.
These should be cut off when they reach about six inches long.
Removing the scapes allows the plant to focus its energy on producing a larger garlic bulb.
The bonus is that scapes are delicious. They taste like a mix of garlic and green onions.
If you end up with more scapes than you can use fresh, here’s how I like to preserve garlic scapes for later use so they can be enjoyed all winter long.
I usually chop them up and freeze them so they can be added to meals later in the winter.
Harvesting Garlic
Garlic is usually ready to harvest in July.
You’ll know the bulbs are ready when most of the leaves have turned brown and only five or six green leaves remain.
To harvest the garlic, loosen the soil around the bulb first.
I use a small hand garden shovel to gently loosen the soil before pulling the plant out.
(Amazon Link Placement #2 – Garden Hand Trowel)
Trying to dig them out with a large shovel can easily slice the bulbs in half — I learned that the hard way.
Curing Garlic
After harvesting, garlic needs time to dry and cure.
I tie 10–15 garlic plants together in bunches and hang them in a dry location with good airflow.
Garlic usually cures in about four weeks, although it can be ready in two weeks if the air is warm and dry.
To test if garlic is cured, cut the stem.
If there is no moisture inside, the garlic is fully cured.
Storing Garlic
Once cured, garlic should be stored in a dry place out of direct sunlight.
Properly stored garlic can last up to six months.
Growing your own garlic is simple, rewarding, and once you start doing it, it’s hard to go back to store-bought garlic again.
For more tips on building a productive garden, see our Gardening and Greenhouse guide, where we cover everything from soil preparation to extending your growing season.
Content on this site is for informational purposes only and reflects personal experience and research. Gardening results can vary based on climate, soil, and growing conditions. Some links may be affiliate links, which help support this site at no additional cost to you.
Updated March 2026
© 2017 – 2026, Teresa. All rights reserved.
I love using garlic to cook and have always entertained the idea of growing them in my backyard. I find it interesting how the garlic bed is left to freeze and then chips are put on top to cover it throughout the winter. The fact that it doesn’t require much maintenance is really making me think more about a garlic bed and maybe growing other vegetables and herbs too.
I learned something new today.
I love garlic too, we use so much that I thought I’d better start growing my own. If really is fairly maintenance free.