
Rocket mass heaters have become one of the most searched off-grid heating solutions for cabins, homesteads, and greenhouses — especially for people looking to heat with less wood, less smoke, and lower long-term costs. If you’re new to rocket stoves and want a clear, beginner-friendly explanation without engineering jargon, this guide walks you through how rocket mass heaters work, how to build one safely, and what common mistakes to avoid.
What Is a Rocket Mass Heater?
A rocket mass heater (often called a rocket stove mass heater) is one of the most efficient wood-burning stoves you can build for off-grid heating. Unlike a traditional wood stove, a rocket heater burns small-diameter wood at very high temperatures, creating near-complete combustion with little smoke.
Instead of sending heat straight up the chimney, the hot exhaust gases are routed through a thermal mass — typically a cob bench — where the heat is stored and slowly released for many hours after the fire goes out.
There are two main rocket mass heater designs:
- J-tube rocket stove – A classic design where wood is fed vertically into a simple firebox.
- Batch box rocket heater – A larger, enclosed firebox that allows you to load more wood at once and burn it in batches.
Both designs can be scaled up or down. Most beginners build either a 6-inch rocket mass heater for small cabins or a larger 8-inch system for bigger spaces or greenhouses.
Rocket Mass Heater vs Wood Stove: Which is Better for Off-Grid Cabins?
Many people considering a rocket mass heater wonder how it compares to a standard wood stove.
A traditional wood stove provides quick radiant heat but requires frequent refueling and sends much of the heat up the chimney. A rocket mass heater, on the other hand, is designed for efficiency. It burns less wood, produces far less smoke, and stores heat in a thermal mass that continues warming the space long after the fire has gone out.
Rocket mass heaters are ideal for off-grid cabins, workshops, and greenhouses where efficiency and fuel savings matter most. Traditional wood stoves may still be a better choice where building codes, insurance requirements, or portability are a concern.
| Feature | Rocket Mass Heater | Traditional Wood Stove |
|---|---|---|
| Fuel Efficiency | Extremely efficient; burns small-diameter wood and twigs | Moderate; requires larger split firewood |
| Wood Consumption | Uses significantly less wood over time | Requires more frequent refueling |
| Heat Type | Stores heat in thermal mass and releases slowly for hours | Produces immediate radiant heat |
| Heat Retention | Long-lasting warmth after fire goes out | Heat drops quickly once fire burns down |
| Smoke Output | Very low when built correctly | Moderate; depends on stove and wood quality |
| Build Complexity | Requires DIY build and careful design | Ready-made units are easier to install |
| Building Code Approval | Often not officially recognized in some regions | Usually EPA-certified and code approved |
| Installation Cost | Lower material cost but more labor | Higher upfront stove cost but simpler install |
| Best For | Full-time off-grid cabins, greenhouses, homesteads | Cabins needing portable or code-approved heat |
Both systems have their place. A rocket mass heater is ideal if you’re committed to efficiency and comfortable with a hands-on build. A traditional wood stove may be a better fit if building codes, insurance, or portability are major concerns.
Recommended Tools & Safety Equipment (What I’d Personally Have On Hand)
Building a rocket mass heater doesn’t require specialty factory parts, but a few quality tools and safety items make the project much smoother — and safer.
These are common tools used for this type of build. If you don’t already have them on hand, I’ve linked to examples of the models many builders use for reference.
🔧 Core Build Tools
- Angle grinder or masonry saw – Cutting firebrick cleanly makes a big difference in how well your burn tunnel seals. A basic angle grinder with a masonry cutting disc is usually enough for small builds.
- Infrared thermometer – This is extremely helpful during testing. It allows you to measure barrel temperature and check for heat loss or draft issues without guessing.
- Stove pipe thermometer – Useful for monitoring exhaust temperatures and confirming your system is drafting properly.
- High-temperature mortar or refractory cement – Don’t substitute regular mortar here. High-heat areas need proper materials to prevent cracking and failure over time.
- Carbon monoxide detector – Even though rocket mass heaters burn clean when built correctly, any indoor heating system should be paired with a CO detector. It’s inexpensive peace of mind.
- Fire extinguisher – Always keep one nearby when testing your first burns.
I’m not a fan of overspending, but this is one project where quality tools matter. Poor cuts, improper sealing, or skipped safety steps can lead to draft problems later on.
If you prefer not to piece everything together individually, many suppliers now offer refractory kits and pre-cut components, which can simplify the build process for beginners.
Materials
- Firebricks (for proper rocket stove burn tunnel dimensions)
- Perlite or vermiculite mixed with clay slip (for riser insulation)
- Steel barrel (a 55-gallon drum works best)
- Clay, sand, and straw (for the cob thermal mass mix)
- Stove pipe or ducting (for the bench and chimney run)
- High-temperature mortar
Sizing Rules You Must Follow (CSA Made Simple)
Correct sizing is critical for draft, efficiency, and safety. Rocket mass heaters are built around a constant cross-sectional area (CSA) principle.
- The feed tube, burn tunnel, and riser must all maintain the same CSA
- A 6-inch rocket mass heater has a CSA of approximately 28 square inches
- An 8-inch rocket mass heater has a CSA of approximately 50 square inches
Increasing size increases heat output but also increases fuel use and space requirements. Bigger is not always better — match the system to the space you are heating.
⚠️ Important Safety Note
Rocket mass heaters operate at extremely high internal temperatures. Proper clearances, non-combustible materials, and good chimney draft are essential. Improper design can cause smoke backdrafting or fire risk. Always test your system thoroughly and check local building codes before installing a rocket mass heater indoors.
Even though rocket mass heaters burn incredibly efficiently, they still rely on proper venting and chimney maintenance. If you’re heating with wood in any form, make sure you understand the basics of creosote buildup, carbon monoxide prevention, and safe clearances. I cover all of that in my complete wood stove safety guide for off-grid homes.
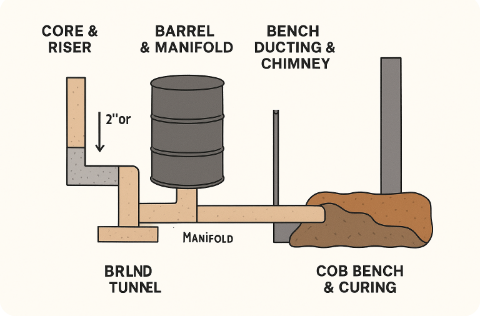
Step-by-Step Build
Core & Riser
Start by laying out your J-tube or batch box core using firebricks.
- The burn tunnel should be roughly twice the feed tube diameter
- Build the riser using insulated materials such as perlite/clay or refractory board
- The riser height should be 2–3 times the feed tube height to ensure strong draft
Barrel & Manifold
Place a 55-gallon steel barrel over the riser, leaving about a 2-inch gap at the top for hot gases to circulate.
At the base of the barrel, create a manifold that redirects exhaust gases into the horizontal ducting. This transition is critical for smooth airflow and heat transfer.
Bench Ducting & Chimney
Run stove pipe through your planned rocket mass heater bench design.
- Keep horizontal ducting runs under 30–40 feet to maintain good draft
- Include cleanout ports for ash removal
- Finish with a vertical chimney stack to ensure proper exhaust flow
Cob Bench & Curing
Mix cob using a basic ratio of 3 parts sand to 1 part clay, adding straw for fiber and strength.
Pack the cob tightly around the ducting to form the thermal bench. Allow the system to cure slowly, using only small test fires during the first week to prevent cracking.
Common Mistakes to Avoid
- Using metal for the riser (it will fail — insulated firebrick or perlite/clay is best)
- Failing to maintain CSA throughout the system
- Making the bench duct run too long, causing draft problems
- Skipping cleanout ports for ash and debris
How to Use, Fuel, and Maintain a Rocket Mass Heater
Rocket mass heaters burn best with dry, small-diameter wood. Twigs, branches, and scrap lumber work well when properly dried.
Routine maintenance includes:
- Cleaning ash from the burn tunnel and cleanouts
- Inspecting the chimney annually
- Patching minor cob cracks with clay slip
- Keeping the feed tube clear to maintain strong draft
Rocket Mass Heater for Greenhouse Heating
A rocket mass heater greenhouse heating system works exceptionally well when the thermal bench is routed along planting beds. The stored heat keeps soil warm overnight, helping extend the growing season and reduce frost damage during cold nights.
Building a rocket mass heater takes planning and hands-on work. If you’re looking for a simpler installation that may meet building codes more easily, a compact EPA-certified wood stove might be a better option.
I’ve put together a breakdown of the best small wood stoves for off-grid cabins here.
Is a Rocket Mass Heater Right for Off-Grid Living?
Rocket mass heaters are best suited for full-time off-grid cabins, homesteads, workshops, and greenhouses where efficiency and fuel savings matter most. They work especially well in cold climates with long heating seasons.
However, they require careful planning, proper materials, and a willingness to learn. If you need a simple, code-approved heating solution, a conventional wood stove may be a better fit.
Frequently Asked Questions
Q: What’s better — a 6-inch or 8-inch rocket mass heater?
A 6-inch rocket mass heater is ideal for small cabins and tiny houses. An 8-inch system is better suited for large homes or greenhouses.
Q: What are safe rocket mass heater plans for beginners?
Start with a simple J-tube design using firebrick and a 55-gallon barrel. Avoid complex manifolds until you understand airflow basics.
Q: What’s the best cob mix ratio for thermal mass?
A typical mix is 3 parts sand to 1 part clay, with straw added for tensile strength. Adjust based on local soil conditions.
Q: Can you cook on a rocket mass heater?
Yes, the barrel surface becomes extremely hot and can be used for basic cooking or boiling water, though rocket mass heaters are not designed as dedicated cookstoves.
Q: Are rocket mass heaters legal?
Rocket mass heater safety and codes vary by region. Many areas do not officially recognize them, so always check local building authorities before installing one indoors.
✅A DIY rocket mass heater is one of the most rewarding and efficient wood-heating projects for off-grid living. With careful planning, proper materials, and safe design, you can build a long-lasting system that provides steady, low-cost heat for your home or greenhouse all winter using remarkably little fuel.
 The Rocket Mass Heater Builders Guide
Disclosure: This site may contain affiliate links. Content is for informational purposes only and reflects personal experience. Always do your own research before making decisions.
Updated Feb 2026
© 2019 – 2026, Teresa. All rights reserved.